OK, I'm finally able to think about making my chalk bag without remembering the second occasion I used it ended in hospitalisation! (For the record, I was bouldering and didn't even have my chalk bag on when I fell and knackered my ankle). Anyway, If you want your very own chalk bag from your choice of funky fabric, here's what to do:
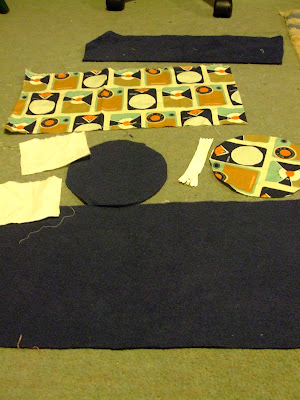
Here are the pieces you need. With 1.5 cm seam allowances included they are
Rectangle 24cm x 48cm one of outer fabric and one of fleece (I think you can get away with 20cm x 48 cm - my bag is huge!)
Circle 8.5 cm in radius, one of outer fabric and one of fleece
Rectangle 14cm x 48cm just of fleece
two rectangles of 10cm x 12 cm in pocket lining fabric
10cm zip
1 m of lacing (shoelace, corset lace, or anything like it)
2 eyelets large enough for the lacing to go through
One of those things that the laces go through (I have no idea what they are called, look at the pictures and you'll see what I mean.
1m cotton tape and some form of buckle.
Step one is to insert the zipped pocket. It's just big enough for a padlock key and some lip balm.
Mark and slash the pocket opening. It should be opposite where the vertical seam will be.
Carefully attach the zip to the opening, right sides together.
Now what I should have done is slash the pocket opening to about 5 mm before the end, then cut to the corners of the opening diagonally (like when making a bound buttonhole).
This will make the opening lie flat, which mine doesn't. So pretend I did that and in the picture below I'm sewing the triangle to the zip.
Attach one pocket lining to each zip tape, then sew the pocket linings together. I find a rounded pocket is less likely to get fluff stuck in the corners.
Sew each large rectangle into a tube, short sides together. Sew each tube to its matching circle, so you have two bucket shapes, one of fleece and one of outer fabric.
Next take the 14 cm x 48 cm fleece rectangle, fold it in half and mark on the halfway line about 4 cm from each short cut edge. This is where you will place your eyelets - follow the eyelet instructions. Sew the short edges together and then thread the lacing through the eyelets so it lies approximately along the halfway line.
Attach some cotton tape over the seamline so you have something to attach to a tape round your waist, or to a caribiner. Only attach it at the top and bottom, the stitching down the long sides is "decorative" as I used contracting thread (sorry for the blurry picture)
Next, put your fleece bucket shape into your outer fabric bucket shape, wrong sides together. Then you take the piece with the eyelets and the lacing and fold it in half so you have the lacing emerging from the eyelets on the outside, but most of the lacing is folded inside. Pin this to the rim of the two bucket shaped pieces and sew.
Next you can attach some stiffening to the rim of your bag. I used millinery wire, but you could use zip ties, or not bother if you aren't bothered about the bag holding itself open. I used the zig zag stitch on my machine to secure it, but hand sewing might be easier to control.
The last step is to encase the rough edges and stiffening in bias tape. Again, I used the machine but this might be easier by hand. I used contrast thread, but matching will look neater.. And here is the finished object:
I hope you find this useful. If you make your own bag I'd love to see it - e-mail me at beautyinthelonely@gmail.com
Happy climbing, and do be careful (especially on the bouldering wall!)


View comments